Using GitHub Actions for multi-clouds deployment with OIDC and rollback support
Table of Contents
- 1 - General View
- 2 - Shaping the clouds
- 3 - OIDC in Actions
- 4 - Controlling the version to deploy
- 5 - The pieces together a.k.a. time to trigger
- 6 - Next steps
That’s it ninjas, spring has arrived, birds are singing and beautiful clouds adorn the sky. It make me remember about these old stories, where some mountain monks could touch multiple of them at once.
Today, we’re going to do the same thing, but with different clouds. Let’s use our GitHub Actions katas to deploy an application to Azure, AWS and GCP ! ☁️☁️☁️
1 - General View #
We’ll deploy the Spring Petclinic sample application as a container application in the cloud, and this is the fork repository where we’ll work on. The “🚀 Multi-cloud deployment” is the main workflow from where the deployment starts. The overall process is as follows:
- Build the application using Maven to generate a JAR file (link to code);
- Build and push a container image ready to run this JAR file (link to code);
- Run the container image on each cloud provider (link to code).
This dojo session will mainly focus on the last step and some of its specificities. If you’ve followed its link, you’ll have noticed that three reusable workflows - one per cloud provider - are called to this end. This is because I will likely use them in future projects, as deploying container applications to the cloud is a common task. Also, this is a nice way to keep the main workflow as simple as possible.
Overall, the deployment will have the following properties:
| Properties | How |
|---|---|
| Automated | The deployment will be performed with GitHub Actions. |
| Versioned | The workflow will be triggered when a new release is published, or manually on specific tags. But not with every tags 🥷👇 |
| Protected | The protection is threefold:
|
| Passwordless | Authentication to the cloud providers is done using the OpenID Connect standard, hence no need to manage any password. |
| Geo-distributed | The application will be deployed on three different geographical locations: ap-southeast-1 for AWS, east us for Azure and europe-west1 for GCP. |
2 - Shaping the clouds #
Each of the cloud providers has its own way(s) to deploy container applications, and provides the associated GitHub Actions to do it. Here is a quick recap of the ones I’ve used:
| Cloud provider | Container Service | GitHub Actions |
|---|---|---|
| Amazon Web Services | Elastic Container Service | |
| Microsoft Azure | Azure Container Instances | Azure/aci-deploy |
| Google Cloud Platform | Cloud Run | google-github-actions/deploy-cloudrun |
Before using these actions in our workflows, we have to set up the cloud infrastructures first. With the aim of keeping this scroll as short as possible, I’ve detailed this process in the doc/infra-setup folder and all the CLI commands are provided. You can also have a look at the quickstart to get an overall picture.
💡 Bonus! If you want to try it, but don’t want to install the CLI tools on your own machine, there is a codespaces setup ready to be used for that ✨
Once it’s done, we’ll use these actions in our reusable workflows to deploy the container application:
- For Amazon (link to step):
- name: Prepare the Amazon ECS task definition to use our container image id: task-def uses: aws-actions/amazon-ecs-render-task-definition@v1 with: task-definition: ${{ inputs.ecs-task-definition }} container-name: ${{ inputs.container-name }} image: ${{ inputs.container-image }} - name: Deploy the Amazon ECS task definition (i.e. deploy the container app) id: deploy_task uses: aws-actions/amazon-ecs-deploy-task-definition@v1 with: task-definition: ${{ steps.task-def.outputs.task-definition }} service: ${{ inputs.ecs-service }} cluster: ${{ inputs.ecs-cluster }} wait-for-service-stability: true - For Azure (link to step):
- name: 'Deploy to Azure Container Instances' uses: 'azure/aci-deploy@v1' with: resource-group: ${{ inputs.resource-group }} dns-name-label: ${{ inputs.deployment-url-prefix }} image: ${{ inputs.container-image }} name: ${{ inputs.deployment-name }} location: ${{ inputs.location }} ports: ${{ inputs.ports }} - For GCP (link to step):
    - id: 'deploy'
      name: 'Deploy the image to Google Cloud Run'
      uses: 'google-github-actions/deploy-cloudrun@v1'
      with:
        service: ${{ inputs.cloudrun-service }}
        image: ${{ inputs.push-to-gar == true && inputs.gar-target-image || inputs.container-image }}
        region: ${{ inputs.region }}
        flags: ${{ inputs.flags }}
You can observe that these workflows are called with different regions [1] [2] [3] for each cloud provider, hence making the deployment geo-distributed. This is a good practice to ensure high availability and to reduce the risk of downtime. And this is by the way just one of the benefits of the multi-cloud approach.
3 - OIDC in Actions #
So the clouds are ready and we know exactly how we’ll deploy our application. That’s neat, but we still have to authenticate beforehand in order to proceed. When it comes to authenticate to cloud providers in GitHub Actions, two good practices pop up:
- Avoid using passwords as they are hard to rotate and can be leaked;
- Use service accounts instead of personal accounts, as they provide better security and control over permissions and access to cloud resources.
And guess what? This is exactly what we gonna do here: we’ll use a service account for each cloud provider, and we’ll configure them to authenticate using the OpenID Connect standard.
Similarly to what we did for the cloud infrastructures, I’ve detailed this process in the doc/oidc-setup folder and the following table summarizes what has been used to this end:
| Cloud provider | Service account construct | OIDC implementation | GitHub Action |
|---|---|---|---|
| Amazon Web Services | IAM role | OIDC identity provider | aws-actions/configure-aws-credentials |
| Microsoft Azure | Service principal | Workload identity federation | Azure/login |
| Google Cloud Platform | Service account | Workload identity federation | google-github-actions/auth |
Once everything is set up, we can authenticate to the cloud providers using OIDC in our reusable workflows:
- For AWS (link to step):
- name: Configure AWS credentials using OIDC uses: aws-actions/configure-aws-credentials@v2 with: role-to-assume: ${{ secrets.oidc-role-to-assume }} role-session-name: workflowrolesession aws-region: ${{ inputs.aws-region }} - For Azure (link to step):
- name: 'Login to Azure using OIDC' uses: azure/login@v1 with: client-id: ${{ secrets.az_client_id }} tenant-id: ${{ secrets.az_tenant_id }} subscription-id: ${{ secrets.az_subscription_id }} - For GCP (link to step):
    - id: 'auth'
      name: 'Authenticate to Google Cloud using OIDC'
      uses: 'google-github-actions/auth@v1'
      with:
        workload_identity_provider: ${{ secrets.workload_identity_provider }}
        service_account: ${{ secrets.service_account }}
        token_format: 'access_token'
You might have noticed that we are still using Actions secrets to pass the OIDC information to the cloud providers. This is just to add an extra layer of security: for instance, if that information was leaked and the OIDC trust relationship was too permissive, an attacker would perhaps be able to access the cloud resources from its own repository.
Here this should not be the case - but we never know! - since during the setup I’ve restricted the trust relationship to the following OIDC identities:
- for AWS, only the identity
repo:ghsioux/multi-cloud-deployment-demo:environment:aws(that is, the GitHub environmentawsof the repositoryghsioux/multi-cloud-deployment-demo) is trusted; - similarly, for Azure, only the identity
repo:ghsioux/multi-cloud-deployment-demo:environment:azureis trusted; - and for GCP, only the identity
repo:ghsioux/multi-cloud-deployment-demo:environment:gcpis trusted.
During the authentication process, the identity checks are performed by the cloud providers based on the token passed by the GitHub OIDC provider.
Allright! We have implemented some mecanisms to make the deployment geo-distributed and passwordless, now let’s make it protected and versioned.
4 - Controlling the version to deploy #
The ones with eyes like the hawk will have observed that there is actually an additional step in the main worflow, that I’ve not listed in the general view above.
To get a bit more context, let’s have a look at the very beginning of the workflow:
name: "🚀 Multi-cloud PetClinic deployment demo"

on:
  workflow_dispatch:
  release:
    types: [published]
The workflow will be triggered manually or when a release is published. I’m working alone on this project, but let’s imagine a more complex scenario where multiple people collaborate. As a repository administrator, I would possibly want to restrict i) who can trigger/re-run the workflow (e.g. only admin), and ii) which tags (and thus associated releases) are allowed to be deployed (e.g. only production tag).
That’s why I’ve added a few checks in the first job of the workflow to ensure that:
  prereq_checks:
    name: Ensure this workflow has been triggered by and admin on a protected release tag (v*)
    runs-on: ubuntu-latest
    env:
      TRIGGERING_ACTOR: ${{ github.triggering_actor }}
    steps:
      - name: Fail if the workflow has been triggered manually with a non-release tag (i.e. not using the 'v*' regex)
        run: |
          if [[ "$GITHUB_REF" != refs/tags/v* ]]; then
            echo "Only 'v*' tags and associated releases can be deployed, exiting."
            exit 1
          else
            echo "The workflow has been triggered on a release tag, continuing."
          fi
      - name: Fail if the workflow has been triggered by a non-admin user
        uses: actions/github-script@v6
        with:
          script: |
            const TRIGGERING_ACTOR = process.env.TRIGGERING_ACTOR
            github.rest.repos.getCollaboratorPermissionLevel({
              owner: context.repo.owner,
              repo: context.repo.repo,
              username: TRIGGERING_ACTOR
              }).then(response => {
                if (response.data.permission == 'admin') {
                  core.info('The github actor has admin permission on this repository. Continuing.')
                } else {
                  core.info('Only repository admins can trigger this workflow. Exiting.')
                  process.exit(1)
                }
              })
As you can see, only member with the admin permission can trigger the workflow, and only tags matching the regexp v* are allowed to be deployed. In parallel, I’ve set up a tag protection rules to restrict v* tags creation to privileged members only. This tag protection rule will also apply when creating a release (i.e. a non-privileged member won’t be authorized to create a release with a tag matching v*).
If you combine this with the use of the 3 dedicated GitHub environments, which are themselves bound to the branches matching v* (i.e. our protected tags) and protected to require a manual approval before deployment, the overall level of security is fairly satisfying.
5 - The pieces together a.k.a. time to trigger #
Congrats, you made it so far, and now comes the time to enjoy and trigger 🔫
Let’s say that the developers have been working hard on the application to add new features, and they are ready to deploy the new version to production.
A member with the admin permission on the repository will create a new release with a tag matching the v* regexp: 
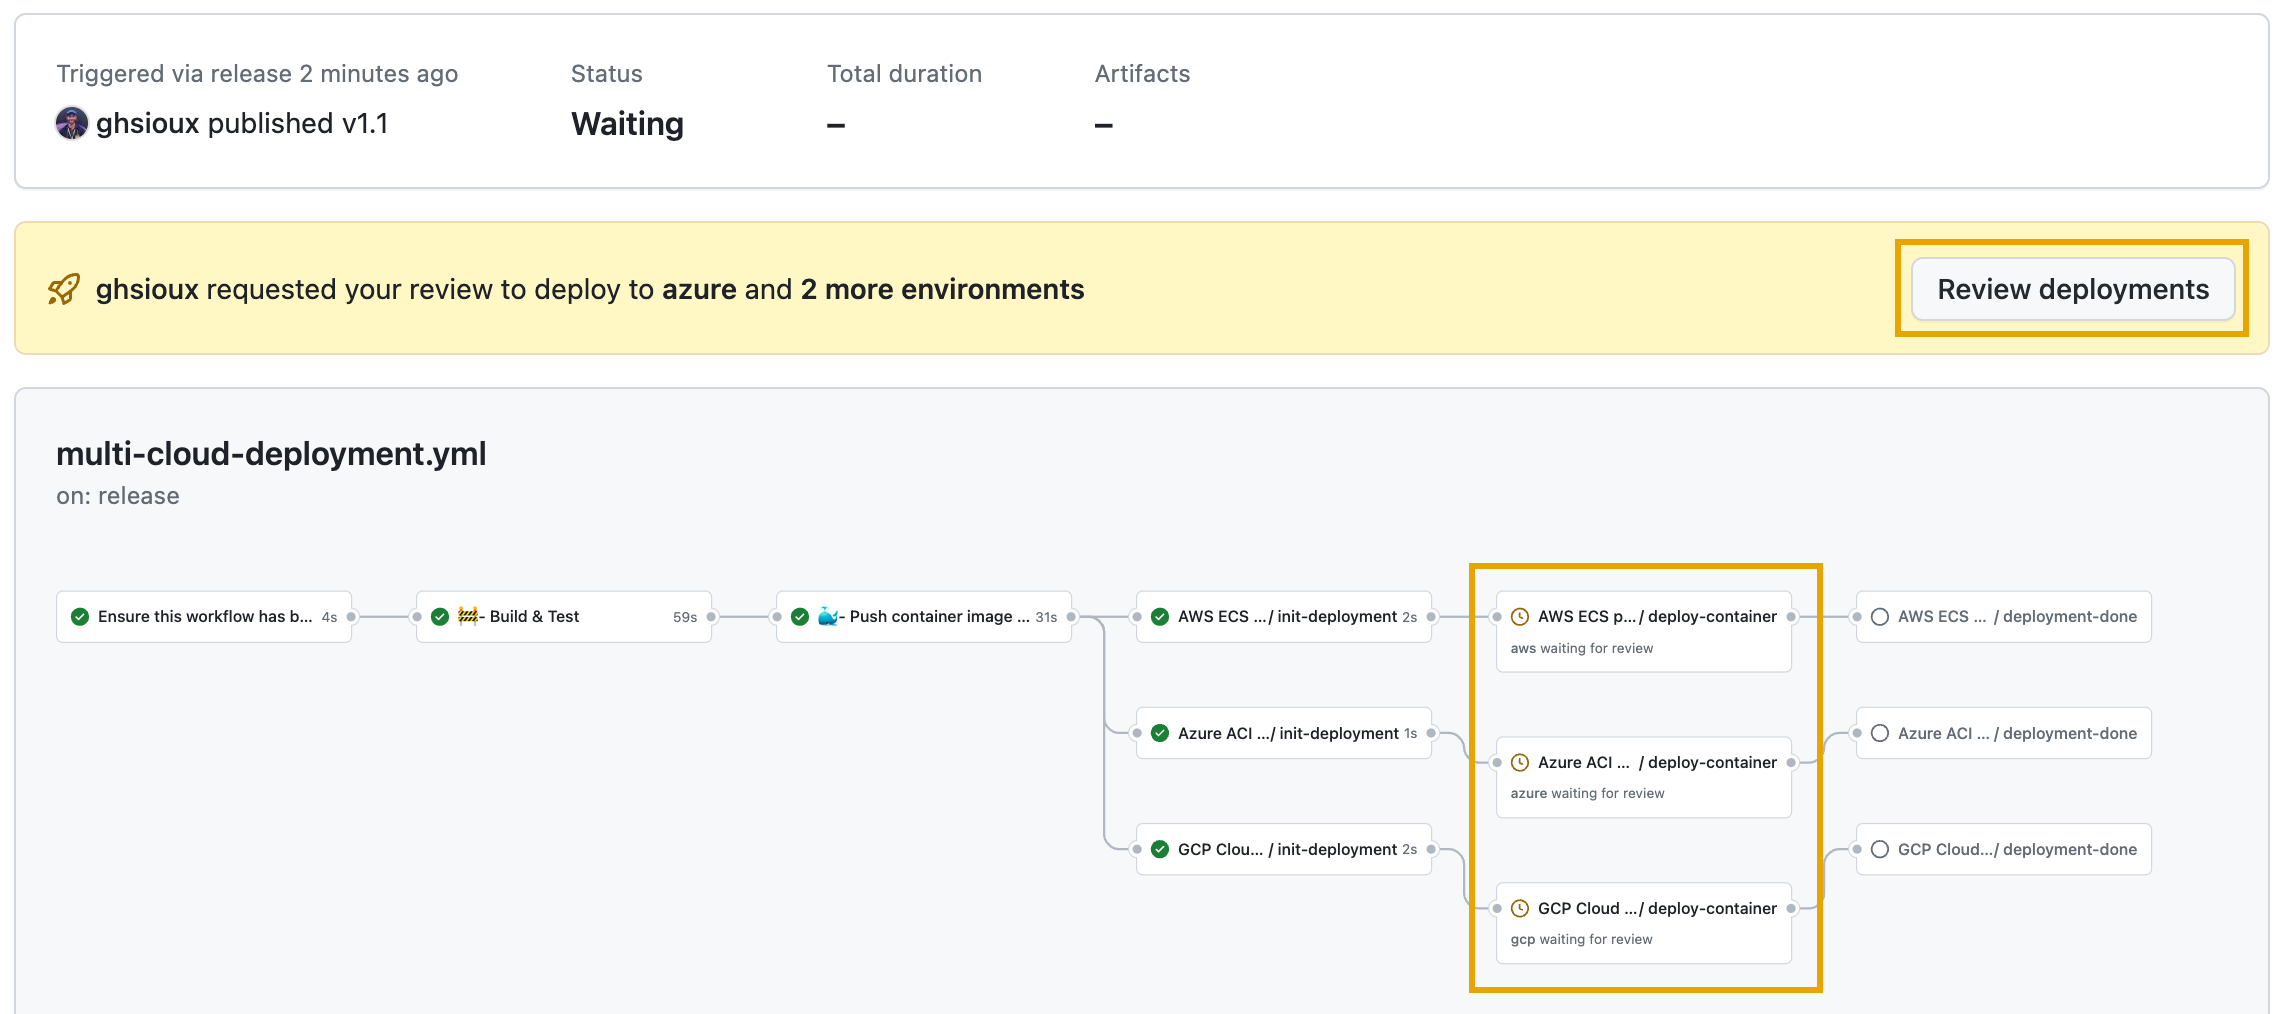
This will trigger the main workflow, and after the checks have passed, the image is built and pushed to the GitHub container registry. Then the three reusable workflows are called, and since they are working on protected environments, a manual approval is required (e.g. by the SRE team): 
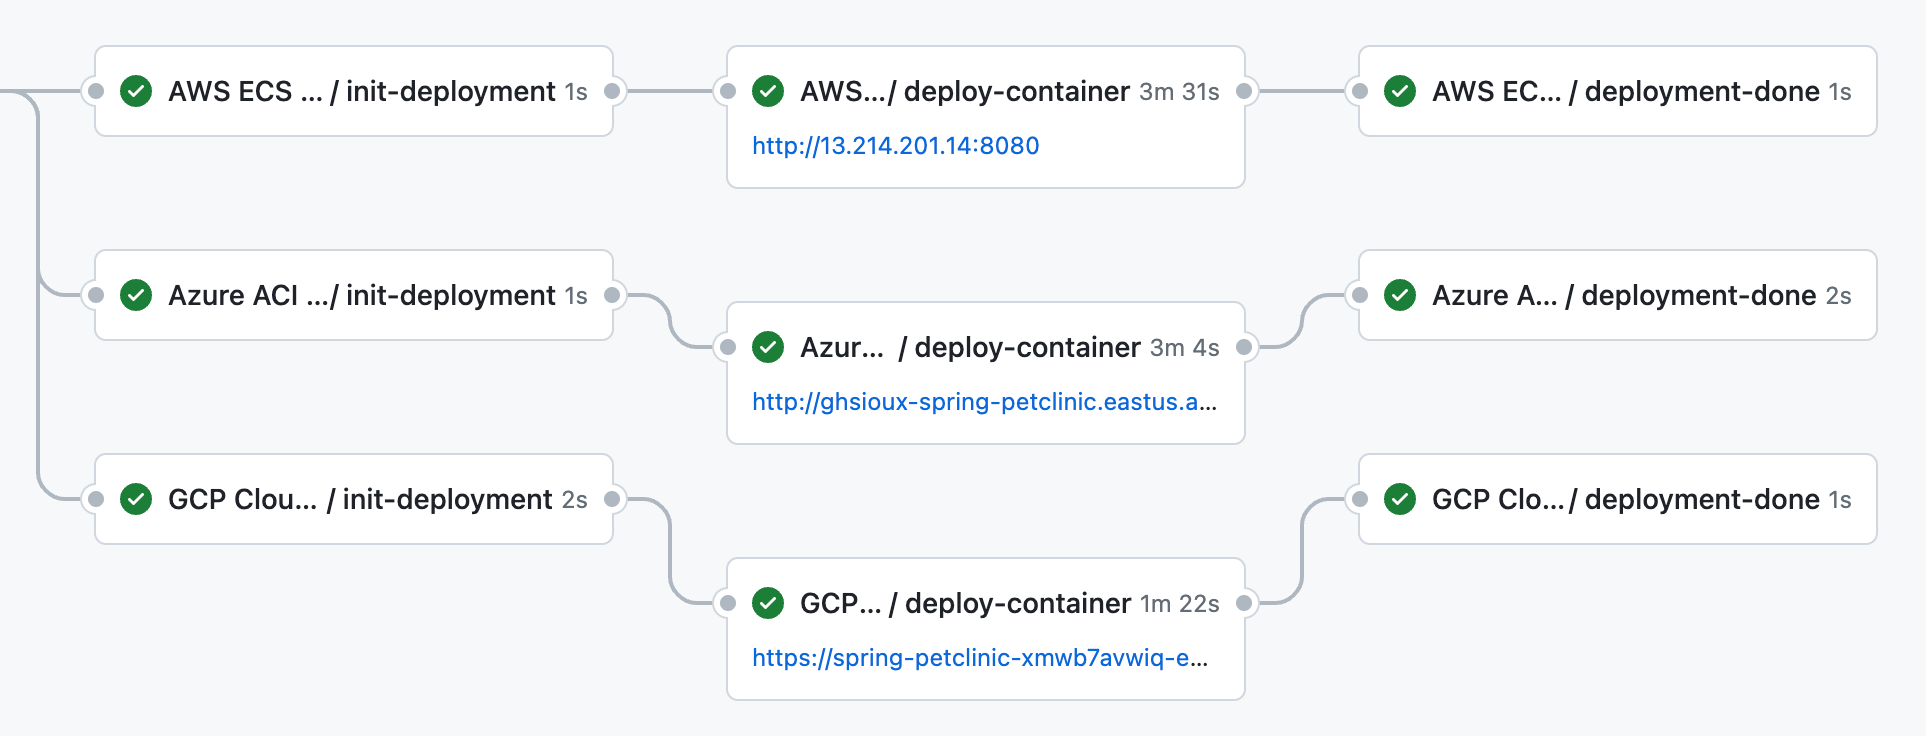
Once the approval is granted, the workflows will continue and the new version of the application will be deployed to our three cloud providers: 
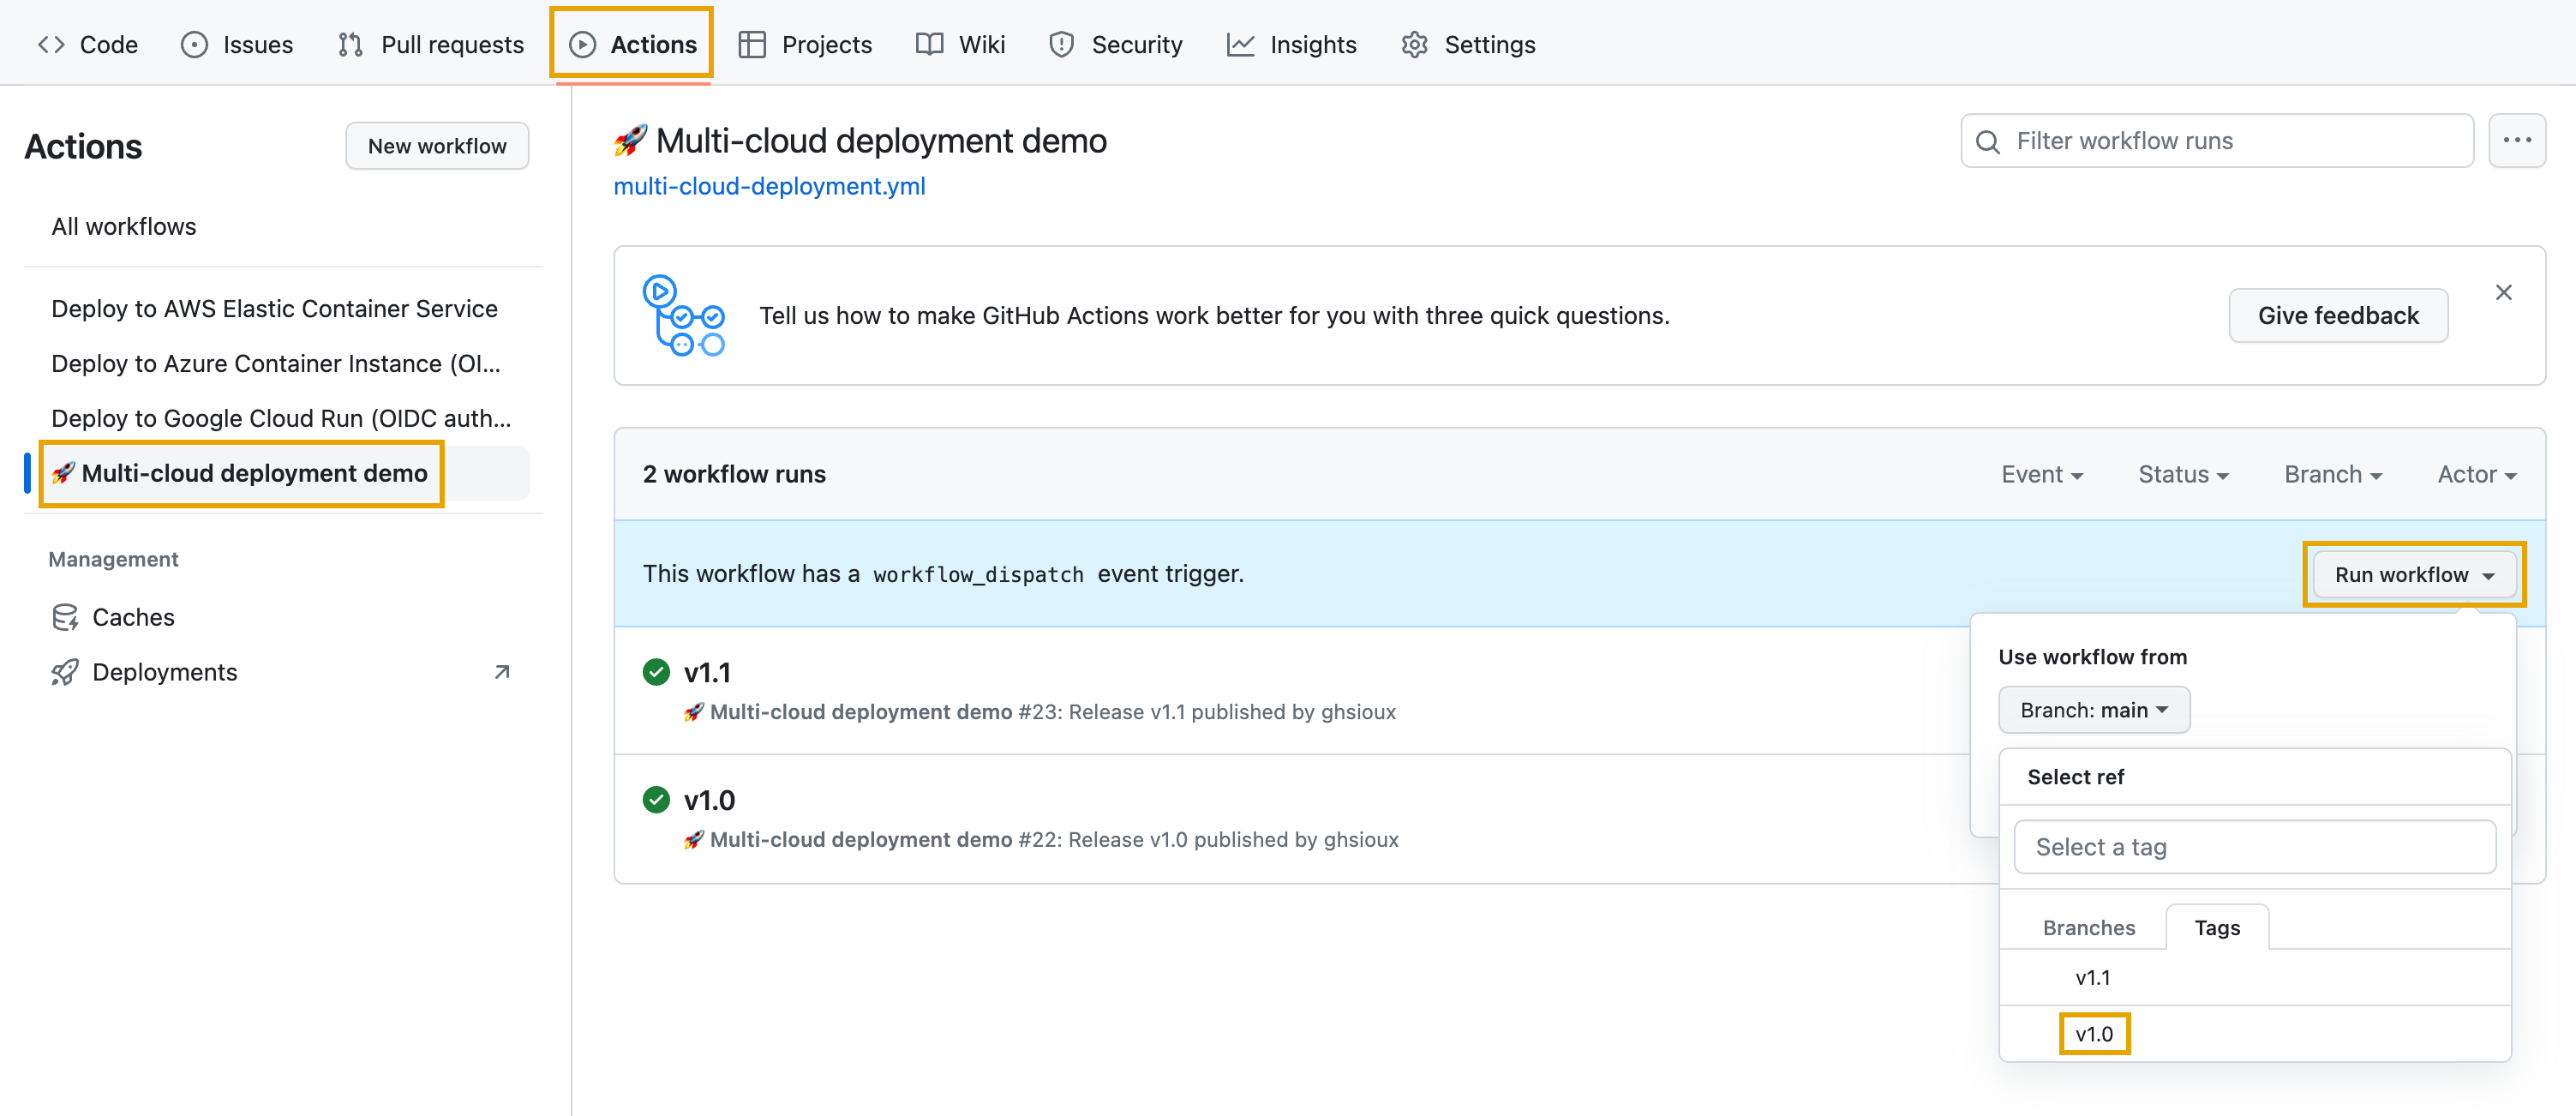
Is that all? Could be, but you know, sometimes accidents happen. Let’s imagine that’s the case, and that the new version of the application is not working as expected. Mayday, mayday, we need to rollback! Nothing more simple, the administrator will just trigger the workflow again, but this time manually, and on the tag matching the previous release: 
Phew, we’re going back to business! 🎉
6 - Next steps #
That was a lot of fun, and I hope you enjoyed it as much as I did. As usual, this is not for production use, and there is room for improvement. I’m sure you have some ideas on how to make this even better!
We could for instance:
- define stricter role permissions and RBAC for our service accounts;
- implement some load-balancing mechanisms (e.g. DNS round-robin, Traefik) to make the application available on a single URL;
- extend the workflow to implement blue/green deployments, A/B testing or canary release approach.
But the sun is shining, and the flowers are blooming, so let’s leave it here for now.
Gasshō 🙏